How do taxes in AYS work?
Taxes that you have to collect on goods and services that you provide can be complex. AYS has a flexible configuration that will help you meet the requirements of your business.
Taxes that you have to collect on goods and services that you provide can be complex. AYS has a flexible configuration that will help you meet the requirements of your business.
You can configure Gmail to send email and email-to-fax messages you create from At Your Service – Repair Centre. This article will show you how to set up your system to authenticate with Google.
The following new features and bug fixes were released in At Your Service version 2022. See also new features added in At Your Service version 2023.
Yes. At Your Service software is supported on Microsoft Windows 11 (32-bit and 64-bit) for all licensed users of version 2022 or higher.
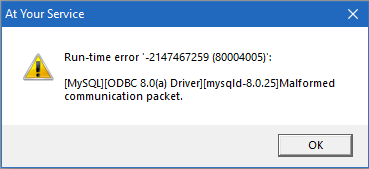
You may encounter the following error with MySQL Server 8.0.25 or below when adding a new record:
After a Windows update, the horizontal scrollbar at the bottom of all browse windows (e.g. Browse Repair Orders, Browse Customers, etc.) is blank. How can I fix this problem?
At Your Service – Repair Center integrates with Microsoft Excel, Microsoft Outlook and Microsoft Word. The following Microsoft Office versions are supported:
The following new features and bug fixes were released in At Your Service version 2020. See also new features added in At Your Service version 2021.
The following new features and bug fixes were released in At Your Service version 2021. See also new features added in At Your Service version 2022.